This is the multi-page printable view of this section. Click here to print.
Tutorials
- 1: Assigning variables to Spin Apps
- 2: Deploy Spin Operator on Azure Kubernetes Service
- 3: Integrating With Docker Desktop
- 4: Integrating With Rancher Desktop
- 5: Package and Deploy Spin Apps
- 6: Scaling Spin App With Horizontal Pod Autoscaling (HPA)
- 7: Scaling Spin App With Kubernetes Event-Driven Autoscaling (KEDA)
- 8: Share Spin Operator Image
- 9: Spin Operator Development
- 10: Running locally
- 11: Running on a Cluster
- 12: Uninstall
1 - Assigning variables to Spin Apps
By using variables, you can alter application behavior without recompiling your SpinApp. When running in Kubernetes, you can either provide constant values for variables, or reference them from Kubernetes primitives such as ConfigMaps and Secrets. This tutorial guides your through the process of assigning variables to your SpinApp.
Prerequisites
Ensure necessary prerequisites are installed.
For this tutorial in particular, you should either have the Spin Operator running locally or running on your Kubernetes cluster.
Build and Store SpinApp in an OCI Registry
We’re going to build the SpinApp and store it inside of a ttl.sh registry. Move into the apps/variable-explorer directory and build the SpinApp we’ve provided:
# Build and publish the sample app
cd apps/variable-explorer
spin build
spin registry push ttl.sh/variable-explorer:1h
Note that the tag at the end of ttl.sh/variable-explorer:1h indicates how long the image will last e.g. 1h (1 hour). The maximum is 24h and you will need to repush if ttl exceeds 24 hours.
For demonstration purposes, we use the variable explorer sample app. It reads three different variables (log_level, platform_name and db_password) and prints their values to the STDOUT stream as shown in the following snippet:
let log_level = variables::get("log_level")?;
let platform_name = variables::get("platform_name")?;
let db_password = variables::get("db_password")?;

println!("# Log Level: {}", log_level);
println!("# Platform name: {}", platform_name);
println!("# DB Password: {}", db_password);
Those variables are defined as part of the Spin manifest (spin.toml), and access to them is granted to the variable-explorer component:
[variables]
log_level = { default = "WARN" }
platform_name = { default = "Fermyon Cloud" }
db_password = { required = true }

[component.variable-explorer.variables]
log_level = "{{ log_level }}"
platform_name = "{{ platform_name }}"
db_password = "{{ db_password }}"
Configuration data in Kubernetes
In Kubernetes, you use ConfigMaps for storing non-sensitive, and Secrets for storing sensitive configuration data. The deployment manifest (config/samples/variable-explorer.yaml) contains specifications for both a ConfigMap and a Secret:
kind: ConfigMap
apiVersion: v1
metadata:
  name: spinapp-cfg
data:
  logLevel: INFO
---
kind: Secret
apiVersion: v1
metadata:
  name: spinapp-secret
data:
  password: c2VjcmV0X3NhdWNlCg==
Assigning variables to a SpinApp
When creating a SpinApp, you can choose from different approaches for specifying variables:
- Providing constant values
- Loading configuration values from ConfigMaps
- Loading configuration values from Secrets
The SpinApp specification contains the variables array, that you use for specifying variables (See kubectl explain spinapp.spec.variables).
The deployment manifest (config/samples/variable-explorer.yaml) specifies a static value for platform_name. The value of log_level is read from the ConfigMap called spinapp-cfg, and the db_password is read from the Secert called spinapp-secret:
kind: SpinApp
apiVersion: core.spinoperator.dev/v1alpha1
metadata:
  name: variable-explorer
spec:
  replicas: 1
  image: ttl.sh/variable-explorer:1h
  executor: containerd-shim-spin
  variables:
    - name: platform_name
      value: Kubernetes
    - name: log_level
      valueFrom:
        configMapKeyRef:
          name: spinapp-cfg
          key: logLevel
          optional: true
    - name: db_password
      valueFrom:
        secretKeyRef:
          name: spinapp-secret
          key: password
          optional: false
As the deployment manifest outlines, you can use the optional property - as you would do when specifying environment variables for a regular Kubernetes Pod - to control if Kubernetes should prevent starting the SpinApp, if the referenced configuration source does not exist.
You can deploy all resources by executing the following command:
kubectl apply -f config/samples/variable-explorer.yaml

configmap/spinapp-cfg created
secret/spinapp-secret created
spinapp.core.spinoperator.dev/variable-explorer created
Inspecting runtime logs of your SpinApp
To verify that all variables are passed correctly to the SpinApp, you can configure port forwarding from your local machine to the corresponding Kubernetes Service:
kubectl port-forward services/variable-explorer 8080:80

Forwarding from 127.0.0.1:8080 -> 80
Forwarding from [::1]:8080 -> 80
When port forwarding is established, you can send an HTTP request to the variable-explorer from within an additional terminal session:
curl http://localhost:8080
Hello from Kubernetes
Finally, you can use kubectl logs to see all logs produced by the variable-explorer at runtime:
kubectl logs -l core.spinoperator.dev/app-name=variable-explorer

# Log Level: INFO
# Platform Name: Kubernetes
# DB Password: secret_sauce
2 - Deploy Spin Operator on Azure Kubernetes Service
In this tutorial, you install Spin Operator on an Azure Kubernetes Service (AKS) cluster and deploy a simple Spin application. You will learn how to:
- Deploy an AKS cluster
- Install Spin Operator Custom Resource Definition and Runtime Class
- Install and verify containerd shim via Kwasm
- Deploy a simple Spin App custom resource on your cluster
Prerequisites
Please see the following sections in the Prerequisites page and fulfill those prerequisite requirements before continuing:
- kubectl - the Kubernetes CLI
- Helm - the package manager for Kubernetes
- Azure CLI - cross-platform CLI for managing Azure resources
Provisioning the necessary Azure Infrastructure
Before you dive into deploying Spin Operator on Azure Kubernetes Service (AKS), the underlying cloud infrastructure must be provisioned. For the sake of this article, you will provision a simple AKS cluster. (Alternatively, you can setup the AKS cluster following this guide from Microsoft.)
# Login with Azure CLI
az login

# Select the desired Azure Subscription
az account set --subscription <YOUR_SUBSCRIPTION>

# Create an Azure Resource Group
az group create --name rg-spin-operator \
    --location germanywestcentral

# Create an AKS cluster
az aks create --name aks-spin-operator \
    --resource-group rg-spin-operator \
    --location germanywestcentral \
    --node-count 1 \
    --tier free \
    --generate-ssh-keys
Once the AKS cluster has been provisioned, use the aks get-credentials command to download credentials for kubectl:
# Download credentials for kubectl
az aks get-credentials --name aks-spin-operator \
    --resource-group rg-spin-operator
For verification, you can use kubectl to browse common resources inside of the AKS cluster:
# Browse namespaces in the AKS cluster
kubectl get namespaces

NAME              STATUS   AGE
default           Active   3m
kube-node-lease   Active   3m
kube-public       Active   3m
kube-system       Active   3m
Deploying the Spin Operator
First, the Custom Resource Definition (CRD) and the Runtime Class for wasmtime-spin-v2 must be installed.
# Install the CRDs
kubectl apply -f https://github.com/spinkube/spin-operator/releases/download/v0.1.0/spin-operator.crds.yaml

# Install the Runtime Class
kubectl apply -f https://github.com/spinkube/spin-operator/releases/download/v0.1.0/spin-operator.runtime-class.yaml
The following installs cert-manager which is required to automatically provision and manage TLS certificates (used by the admission webhook system of Spin Operator)
# Install cert-manager CRDs
kubectl apply -f https://github.com/cert-manager/cert-manager/releases/download/v1.14.3/cert-manager.crds.yaml

# Add and update Jetstack repository
helm repo add jetstack https://charts.jetstack.io
helm repo update

# Install the cert-manager Helm chart
helm install cert-manager jetstack/cert-manager \
  --namespace cert-manager \
  --create-namespace \
  --version v1.14.3
The Spin Operator chart also has a dependency on Kwasm, which you use to install containerd-wasm-shim on the Kubernetes node(s):
# Add Helm repository if not already done
helm repo add kwasm http://kwasm.sh/kwasm-operator/
helm repo update

# Install KWasm operator
helm install \
  kwasm-operator kwasm/kwasm-operator \
  --namespace kwasm \
  --create-namespace \
  --set kwasmOperator.installerImage=ghcr.io/spinkube/containerd-shim-spin/node-installer:v0.14.1

# Provision Nodes
kubectl annotate node --all kwasm.sh/kwasm-node=true
To verify containerd-wasm-shim installation, you can inspect the logs from the Kwasm Operator:
# Inspect logs from the Kwasm Operator
kubectl logs -n kwasm -l app.kubernetes.io/name=kwasm-operator

{"level":"info","node":"aks-nodepool1-31687461-vmss000000","time":"2024-02-12T11:23:43Z","message":"Trying to Deploy on aks-nodepool1-31687461-vmss000000"}
{"level":"info","time":"2024-02-12T11:23:43Z","message":"Job aks-nodepool1-31687461-vmss000000-provision-kwasm is still Ongoing"}
{"level":"info","time":"2024-02-12T11:24:00Z","message":"Job aks-nodepool1-31687461-vmss000000-provision-kwasm is Completed. Happy WASMing"}
The following installs the chart with the release name spin-operator in the spin-operator namespace:
helm install spin-operator \
  --namespace spin-operator \
  --create-namespace \
  --version 0.1.0 \
  --wait \
  oci://ghcr.io/spinkube/charts/spin-operator
Lastly, create the shim executor::
kubectl apply -f https://github.com/spinkube/spin-operator/releases/download/v0.1.0/spin-operator.shim-executor.yaml
Deploying a Spin App to AKS
To validate the Spin Operator deployment, you will deploy a simple Spin App to the AKS cluster. The following command will install a simple Spin App using the SpinApp CRD you provisioned in the previous section:
# Deploy a sample Spin app
kubectl apply -f https://raw.githubusercontent.com/spinkube/spin-operator/main/config/samples/simple.yaml
Verifying the Spin App
Configure port forwarding from port 8080 of your local machine to port 80 of the Kubernetes service which points to the Spin App you installed in the previous section:
kubectl port-forward services/simple-spinapp 8080:80
Forwarding from 127.0.0.1:8080 -> 80
Forwarding from [::1]:8080 -> 80
Send a HTTP request to http://127.0.0.1:8080/hello using curl:
# Send an HTTP GET request to the Spin App
curl -iX GET http://localhost:8080/hello
HTTP/1.1 200 OK
transfer-encoding: chunked
date: Mon, 12 Feb 2024 12:23:52 GMT

Hello world from Spin!%
Removing the Azure infrastructure
To delete the Azure infrastructure created as part of this article, use the following command:
# Remove all Azure resources
az group delete --name rg-spin-operator \
    --no-wait \
    --yes
3 - Integrating With Docker Desktop
Docker Desktop is an open-source application that provides all the essentials to work with containers and Kubernetes on your desktop.
Prerequisites
The prerequisites for this tutorial are the Docker Desktop and assets listed in the SpinKube quickstart. Let’s dive in.
Docker Desktop
First, install the latest version of Docker Desktop.
Docker Desktop Preferences
WebAssembly (Wasm) support is still an in-development (Beta) feature of Docker Desktop. Wasm support is disabled by default. To turn it on, open your Docker Desktop settings menu and click the gear icon in the top right corner of the navigation bar. Click Extensions from the menu on the left and ensure that boxes relating to Docker Marketplace and Docker Extensions system containers are checked (as shown in the image below). Checking these boxes enables the “Features in development” extension.
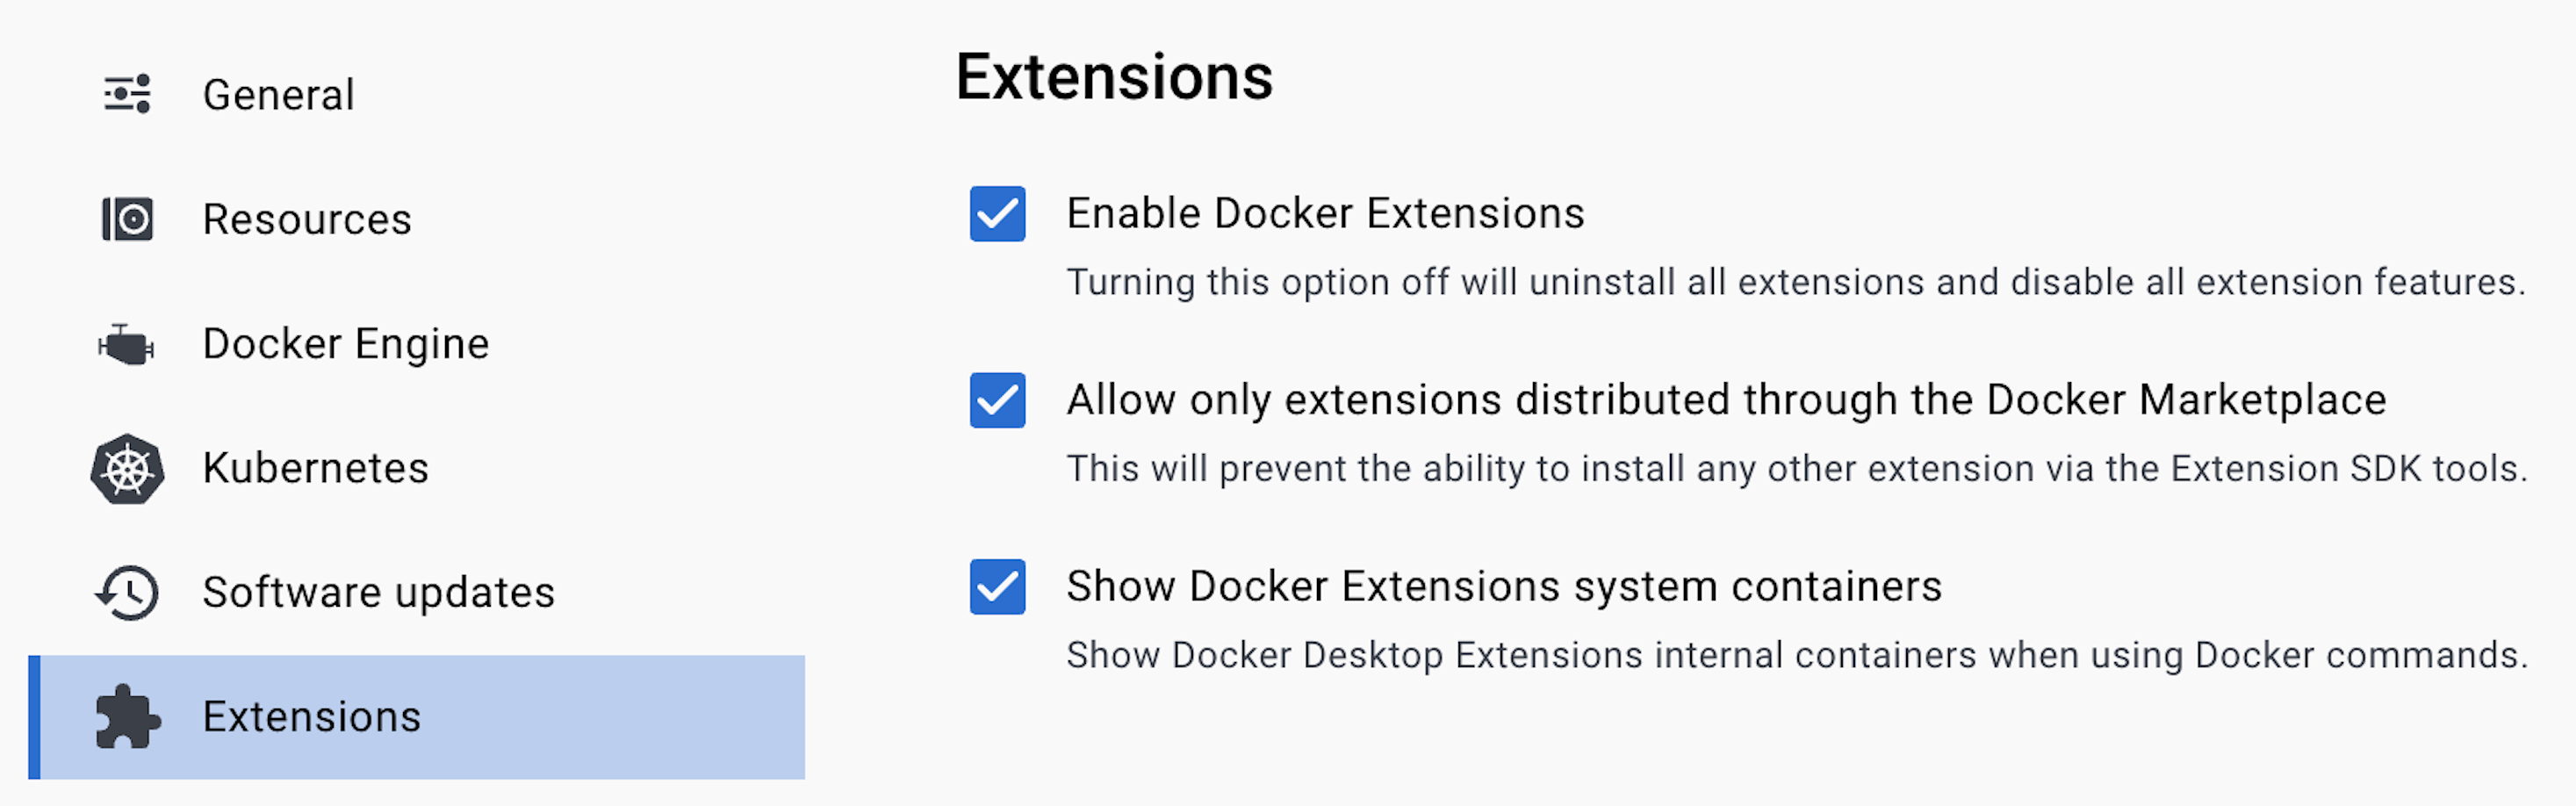
Please ensure that you press “Apply & restart” to save any changes.
Click on Features in development from the menu on the left, and enable the following two options:
- “Use containerd for pulling and storing images”: This turns on
containerdsupport, which is necessary for Wasm. - “Enable Wasm”: This installs the Wasm subsystem, which includes
containerdshims and Spin (among other things).

Make sure you press “Apply & restart” to save the changes.
Docker Desktop is Wasm-ready!
Click on “Kubernetes” and check the “Enable Kubernetes” box, as shown below.
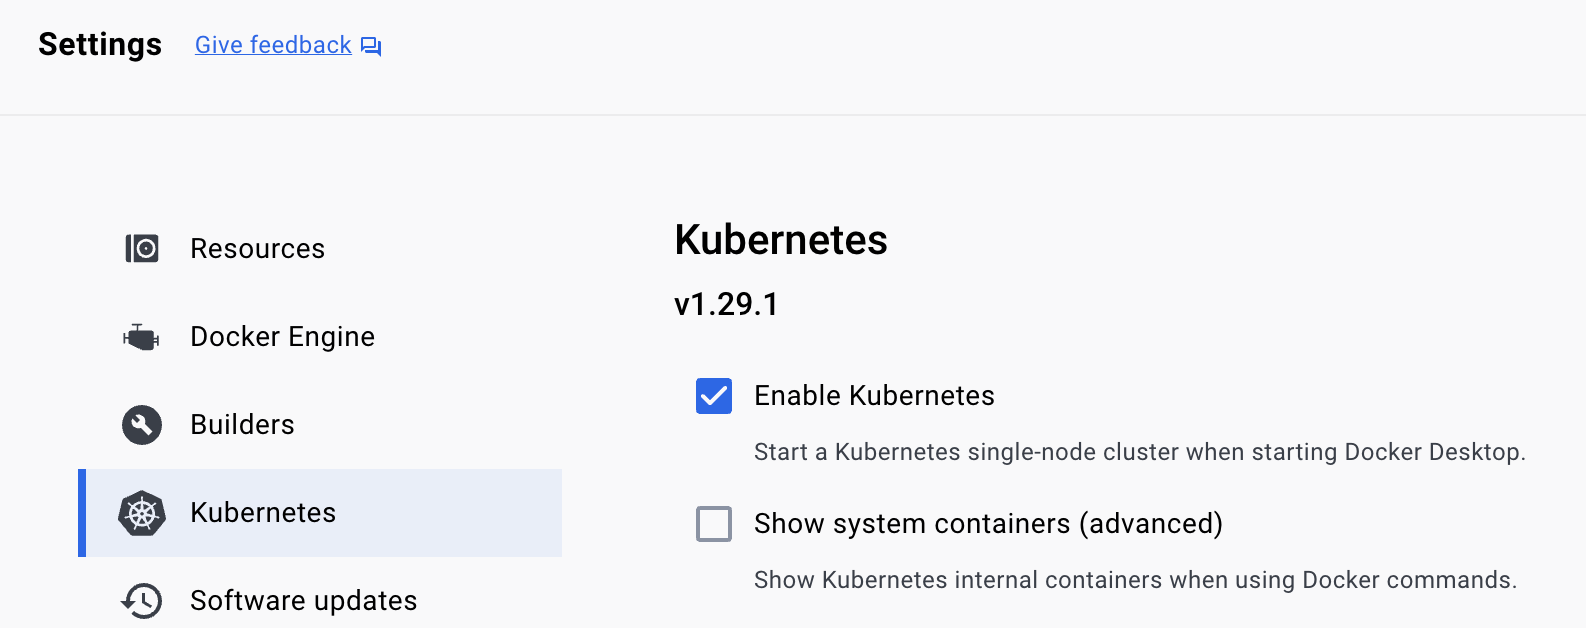
Make sure you press “Apply & restart” to save the changes.
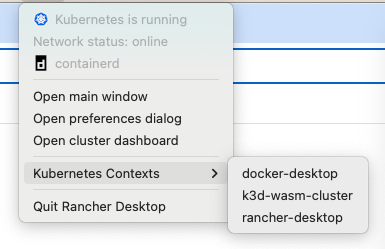
Select docker-desktop from the Kubernetes Contexts configuration in your toolbar.

SpinKube
The following commands are from the SpinKube Quickstart guide. Please refer to the quickstart if you have any queries.
The following commands install all of the necessary items that can be found in the quickstart:
kubectl apply -f https://github.com/cert-manager/cert-manager/releases/download/v1.14.3/cert-manager.yaml
kubectl apply -f https://github.com/spinkube/spin-operator/releases/download/v0.1.0/spin-operator.crds.yaml
kubectl apply -f https://github.com/spinkube/spin-operator/releases/download/v0.1.0/spin-operator.runtime-class.yaml
kubectl apply -f https://github.com/spinkube/spin-operator/releases/download/v0.1.0/spin-operator.shim-executor.yaml

helm install spin-operator \
  --namespace spin-operator \
  --create-namespace \
  --version 0.1.0 \
  --wait \
  oci://ghcr.io/spinkube/charts/spin-operator
helm repo add kwasm http://kwasm.sh/kwasm-operator/

helm install \
  kwasm-operator kwasm/kwasm-operator \
  --namespace kwasm \
  --create-namespace \
  --set kwasmOperator.installerImage=ghcr.io/spinkube/containerd-shim-spin/node-installer:v0.14.1

kubectl annotate node --all kwasm.sh/kwasm-node=true
Creating Our Spin Application
Next, we create a new Spin app using the Javascript template:
spin new -t http-js hello-docker --accept-defaults
cd hello-docker
npm install
We then edit the Javascript source file (the src/index.js file) to match the following:
export async function handleRequest(request) {
    return {
        status: 200,
        headers: {"content-type": "text/plain"},
        body: "Hello from Docker Desktop" // <-- This changed
    }
}
All that’s left to do is build the app:
spin build
Deploying Our Spin App to Docker
We publish our application using the spin registry command:
docker push tpmccallum/hello-docker
The command above will return output similar to the following:
Using default tag: latest
The push refers to repository [docker.io/tpmccallum/hello-docker]
latest: digest: sha256:f24bf4fae2dc7dd80cad25b3d3a6bceb566b257c03b7ff5b9dd9fe36b05f06e0 size: 695
Once published, we can read the configuration of our published application using the spin kube scaffold command:
spin kube scaffold -f tpmccallum/hello-docker
The above command will return something similar to the following YAML:
apiVersion: core.spinoperator.dev/v1alpha1
kind: SpinApp
metadata:
  name: hello-docker
spec:
  image: "tpmccallum/hello-docker"
  executor: containerd-shim-spin
  replicas: 2
We can run this using the following command:
spin kube deploy --from docker.io/tpmccallum/hello-docker
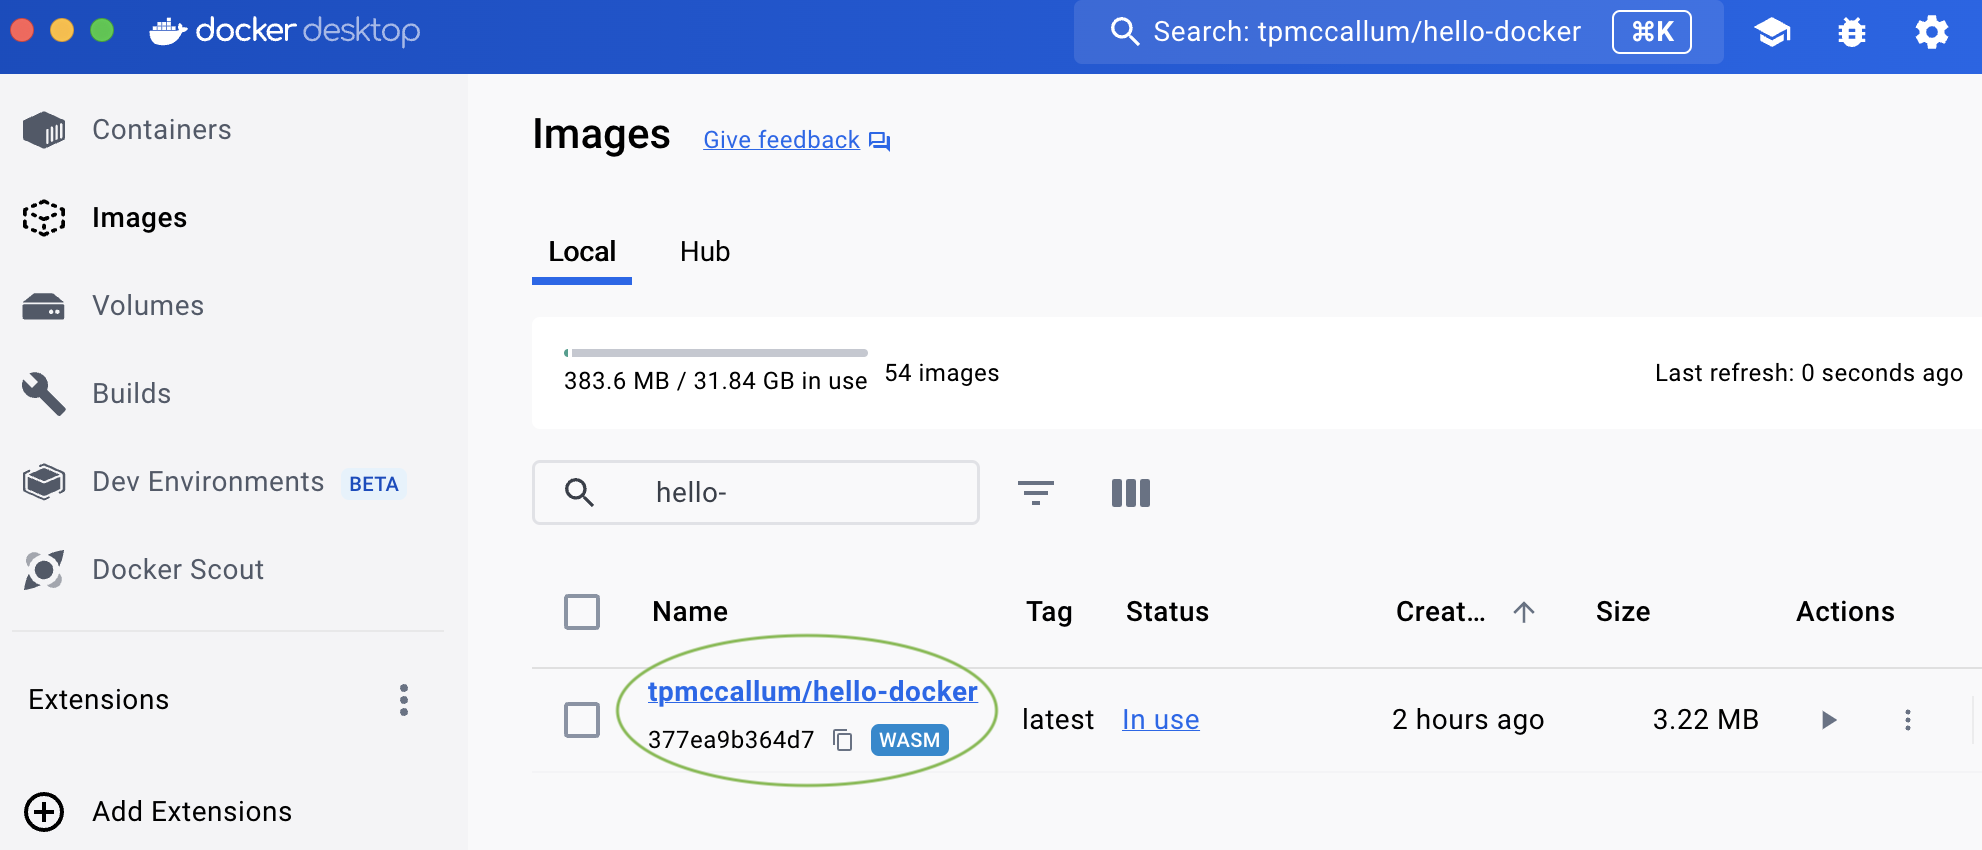
If we look at the “Images” section of Docker Desktop we see tpmccallum/hello-docker:
We can test the Wasm-powered Spin app that is running via Docker using the following request:
curl localhost:3000
Which returns the following:
Hello from Docker Desktop
4 - Integrating With Rancher Desktop
Rancher Desktop is an open-source application that provides all the essentials to work with containers and Kubernetes on your desktop.
Prerequisites
The prerequisites for this tutorial are Rancher Desktop and assets listed in the SpinKube quickstart. Let’s dive in.
Rancher Desktop
First, install the latest version of Rancher Desktop.
Rancher Desktop Preferences
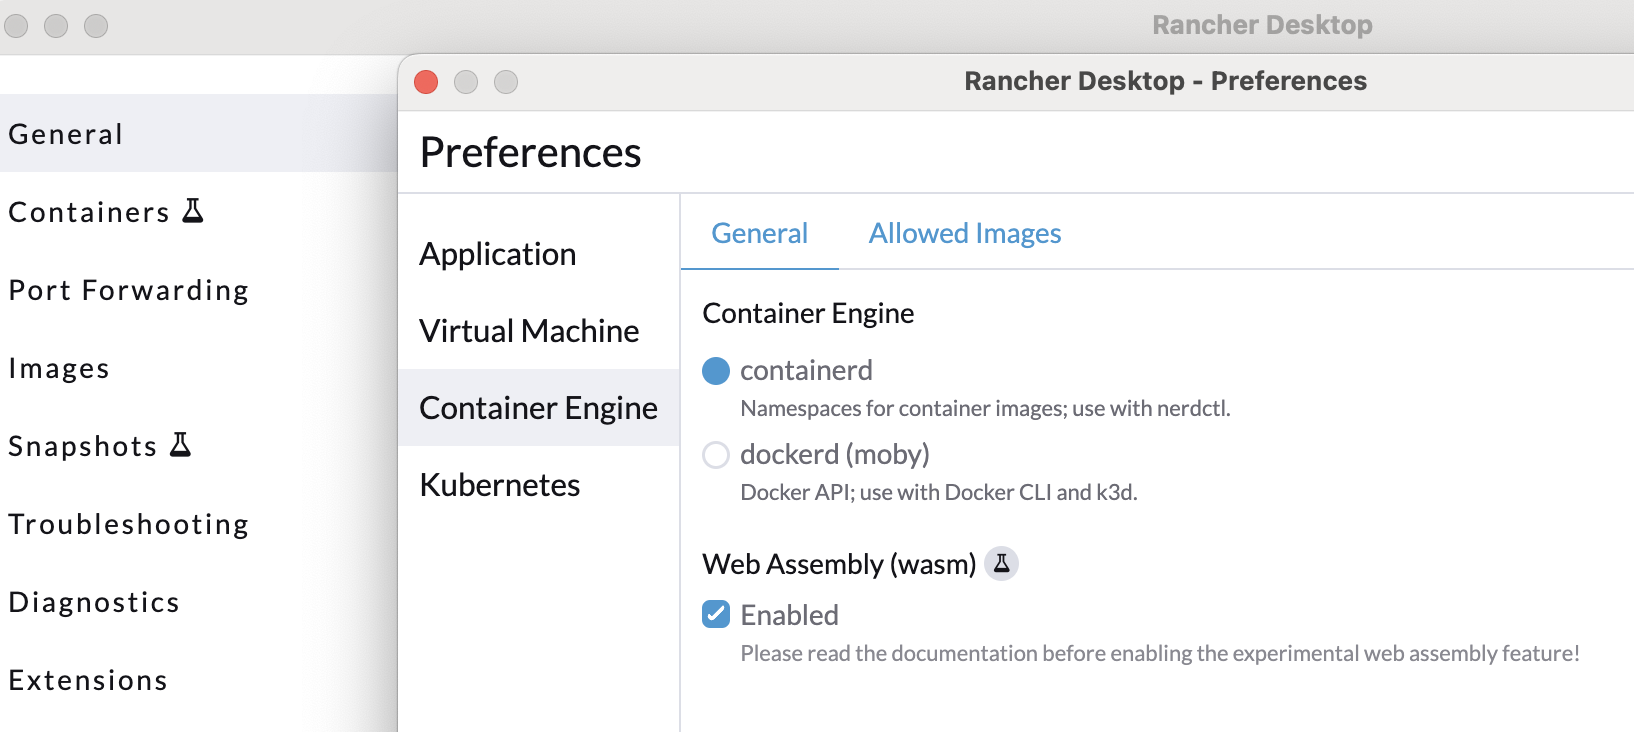
Check the “Container Engine” section of your “Preferences” to ensure that containerd is your runtime and that “Wasm” is enabled. As shown below.
Also, select rancher-desktop from the Kubernetes Contexts configuration in your toolbar.
SpinKube
The following commands are from the SpinKube Quickstart guide. Please refer to the quickstart if you have any queries.
The following commands install all of the necessary items that can be found in the quickstart:
kubectl apply -f https://github.com/cert-manager/cert-manager/releases/download/v1.14.3/cert-manager.yaml
kubectl apply -f https://github.com/spinkube/spin-operator/releases/download/v0.1.0/spin-operator.crds.yaml
kubectl apply -f https://github.com/spinkube/spin-operator/releases/download/v0.1.0/spin-operator.runtime-class.yaml
kubectl apply -f https://github.com/spinkube/spin-operator/releases/download/v0.1.0/spin-operator.shim-executor.yaml

helm install spin-operator \
  --namespace spin-operator \
  --create-namespace \
  --version 0.1.0 \
  --wait \
  oci://ghcr.io/spinkube/charts/spin-operator
helm repo add kwasm http://kwasm.sh/kwasm-operator/

helm install \
  kwasm-operator kwasm/kwasm-operator \
  --namespace kwasm \
  --create-namespace \
  --set kwasmOperator.installerImage=ghcr.io/spinkube/containerd-shim-spin/node-installer:v0.14.1

kubectl annotate node --all kwasm.sh/kwasm-node=true
Creating Our Spin Application
Next, we create a new Spin app using the Javascript template:
spin new -t http-js hello-k3s --accept-defaults
cd hello-k3s
npm install
We then edit the Javascript source file (the src/index.js file) to match the following:
export async function handleRequest(request) {
    return {
        status: 200,
        headers: {"content-type": "text/plain"},
        body: "Hello from Rancher Desktop" // <-- This changed
    }
}
All that’s left to do is build the app:
spin build
Deploying Our Spin App to Rancher Desktop with SpinKube
We publish our application using the spin registry command:
spin registry push ttl.sh/hello-k3s:0.1.0
Once published, we can read the configuration of our published application using the spin kube scaffold command:
spin kube scaffold --from ttl.sh/hello-k3s:0.1.0
The above command will return something similar to the following YAML:
apiVersion: core.spinoperator.dev/v1alpha1
kind: SpinApp
metadata:
  name: hello-k3s
spec:
  image: "ttl.sh/hello-k3s:0.1.0"
  executor: containerd-shim-spin
  replicas: 2
Now, we can deploy the app into our cluster:
spin kube deploy --from ttl.sh/hello-k3s:0.1.0
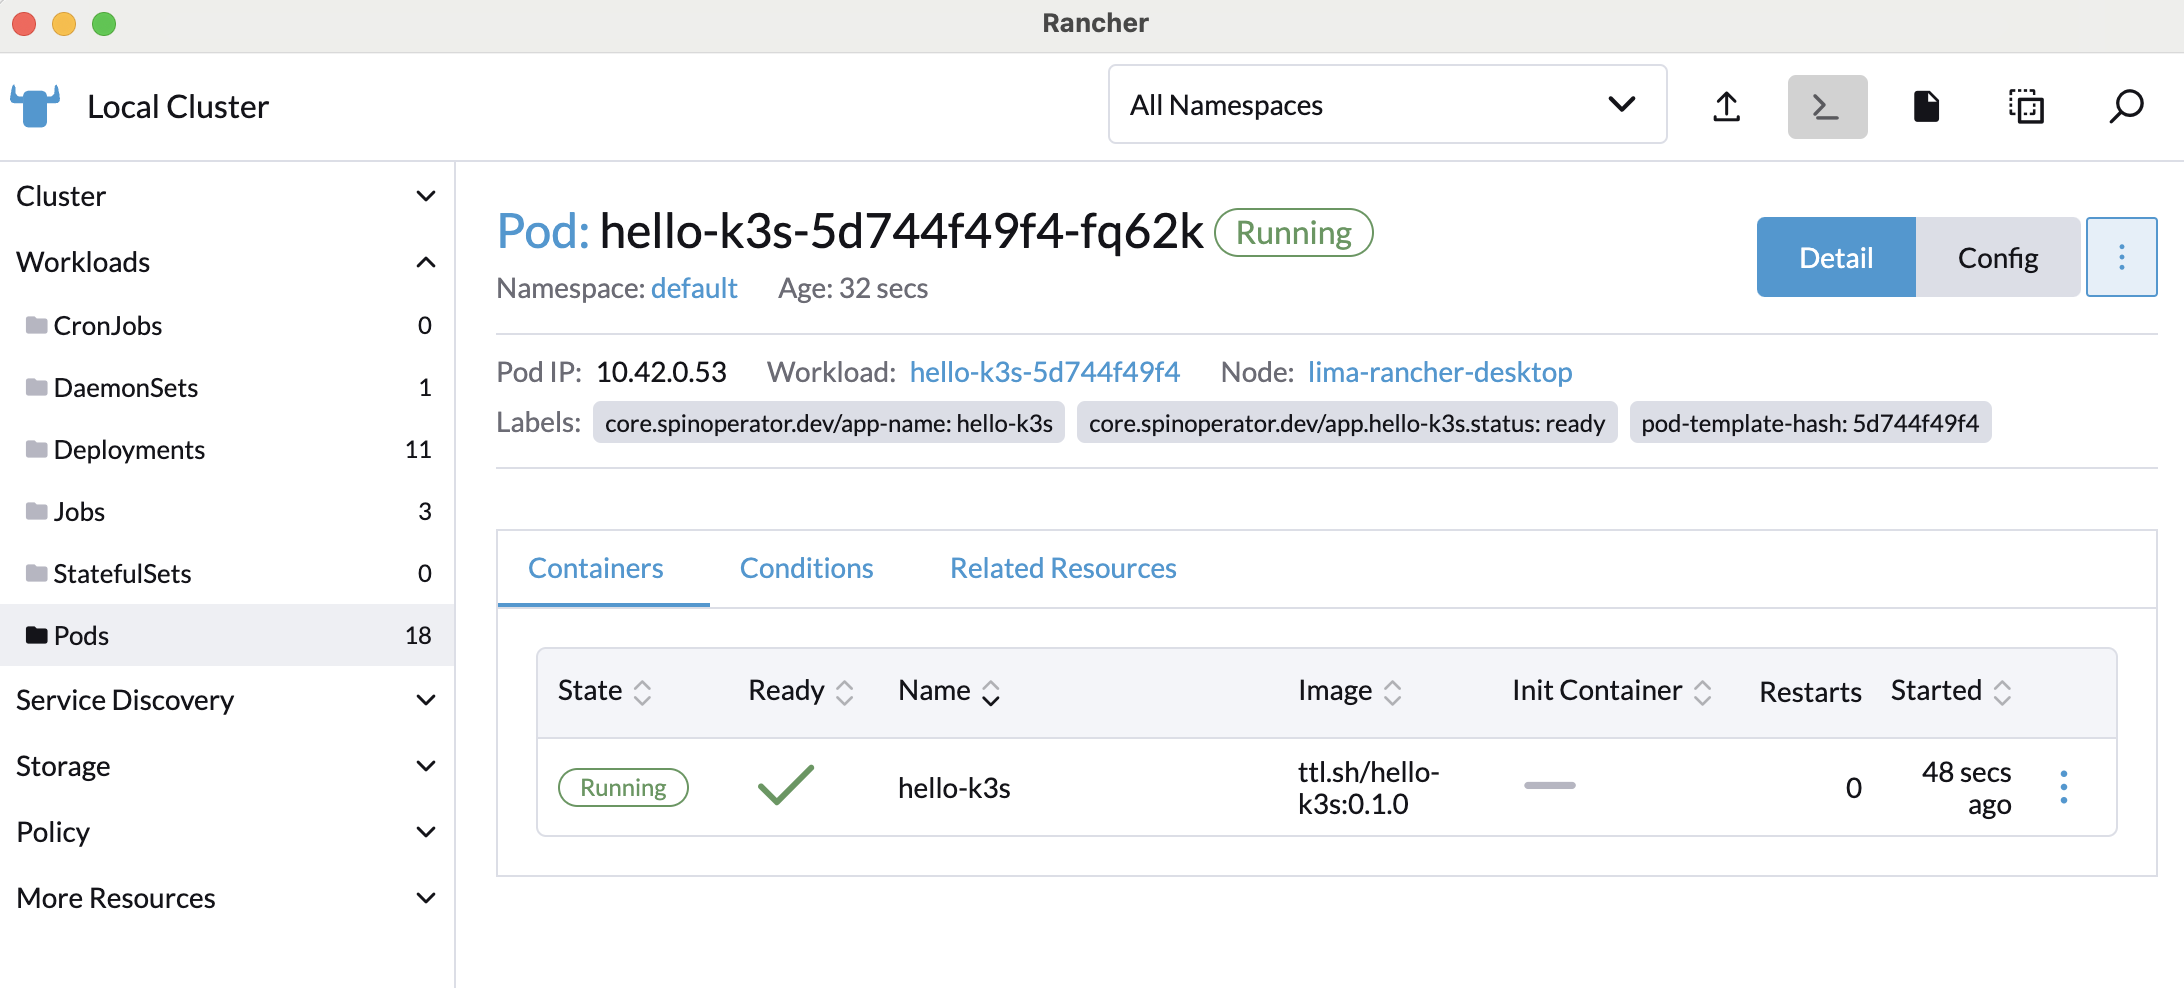
If we click on the Rancher Desktop’s “Cluster Dashboard”, we can see hello-k3s:0.1.0 running inside the “Workloads” dropdown section:
To access our app outside of the cluster, we can forward the port so that we access the application from our host machine:
kubectl port-forward svc/hello-k3s 8083:80
To test locally, we can make a request as follows:
curl localhost:8083
The above curl command will return the following:
Hello from Rancher Desktop
5 - Package and Deploy Spin Apps
This article explains how Spin Apps are packaged and distributed via both public and private registries. You will learn how to:
- Package and distribute Spin Apps
- Deploy Spin Apps
- Scaffold Kubernetes Manifests for Spin Apps
- Use private registries that require authentication
Prerequisites
Ensure the necessary prerequisites are installed.
For this tutorial in particular, you need
- Spin Operator running locally or running on your Kubernetes cluster
- TinyGo - for building the Spin app
- kubectl - the Kubernetes CLI
- spin - the Spin CLI
- spin kube - the Kubernetes plugin for
spin
Creating a new Spin App
You use the spin CLI, to create a new Spin App. The spin CLI provides different templates, which you can use to quickly create different kinds of Spin Apps. For demonstration purposes, you will use the http-go template to create a simple Spin App.
# Create a new Spin App using the http-go template
spin new --accept-defaults -t http-go hello-spin

# Navigate into the hello-spin directory
cd hello-spin
The spin CLI created all necessary files within hello-spin. Besides the Spin Manifest (spin.toml), you can find the actual implementation of the app in main.go:
package main

import (
	"fmt"
	"net/http"

	spinhttp "github.com/fermyon/spin/sdk/go/v2/http"
)

func init() {
	spinhttp.Handle(func(w http.ResponseWriter, r *http.Request) {
		w.Header().Set("Content-Type", "text/plain")
		fmt.Fprintln(w, "Hello Fermyon!")
	})
}

func main() {}
This implementation will respond to any incoming HTTP request, and return an HTTP response with a status code of 200 (Ok) and send Hello Fermyon as the response body.
You can test the app on your local machine by invoking the spin up command from within the hello-spin folder.
Packaging and Distributing Spin Apps
Spin Apps are packaged and distributed as OCI artifacts. By leveraging OCI artifacts, Spin Apps can be distributed using any registry that implements the Open Container Initiative Distribution Specification (a.k.a. “OCI Distribution Spec”).
The spin CLI simplifies packaging and distribution of Spin Apps and provides an atomic command for this (spin registry push). You can package and distribute the hello-spin app that you created as part of the previous section like this:
# Package and Distribute the hello-spin app
spin registry push --build ttl.sh/hello-spin:24h
It is a good practice to add the
--buildflag tospin registry push. It prevents you from accidentally pushing an outdated version of your Spin App to your registry of choice.
Deploying Spin Apps
To deploy Spin Apps to a Kubernetes cluster which has Spin Operator running, you use the kube plugin for spin. Use the spin kube deploy command as shown here to deploy the hello-spin app to your Kubernetes cluster:
# Deploy the hello-spin app to your Kubernetes Cluster
spin kube deploy --from ttl.sh/hello-spin:24h

spinapp.core.spinoperator.dev/hello-spin created
Scaffolding Spin Apps
In the previous section, you deployed the hello-spin app using the spin kube deploy command. Although this is handy, you may want to inspect, or alter the Kubernetes manifests before applying them. You use the spin kube scaffold command to generate Kubernetes manifests:
spin kube scaffold --from ttl.sh/hello-spin:24h
apiVersion: core.spinoperator.dev/v1alpha1
kind: SpinApp
metadata:
  name: hello-spin
spec:
  image: "ttl.sh/hello-spin:24h"
  replicas: 2
By default, the command will print all Kubernetes menifests to STDOUT. Alternatively, you can specify the out argument to store the manifests to a file:
# Scaffold manifests to spinapp.yaml
spin kube scaffold --from ttl.sh/hello-spin:24h \
    --out spinapp.yaml

# Print contents of spinapp.yaml
cat spinapp.yaml
apiVersion: core.spinoperator.dev/v1alpha1
kind: SpinApp
metadata:
  name: hello-spin
spec:
  image: "ttl.sh/hello-spin:24h"
  replicas: 2
Distributing and Deploying Spin Apps via private registries
It is quite common to distribute Spin Apps through private registries that require some sort of authentication. To publish a Spin App to a private registry, you have to authenticate using the spin registry login command.
For demonstration purposes, you will now distribute the Spin App via GitHub Container Registry (GHCR). You can follow this guide by GitHub to create a new personal access token (PAT), which is required for authentication.
# Store PAT and GitHub username as environment variables
export GH_PAT=YOUR_TOKEN
export GH_USER=YOUR_GITHUB_USERNAME

# Authenticate spin CLI with GHCR
echo $GH_PAT | spin registry login ghcr.io -u $GH_USER --password-stdin

Successfully logged in as YOUR_GITHUB_USERNAME to registry ghcr.io
Once authentication succeeded, you can use spin registry push to push your Spin App to GHCR:
# Push hello-spin to GHCR
spin registry push --build ghcr.io/$GH_USER/hello-spin:0.0.1

Pushing app to the Registry...
Pushed with digest sha256:1611d51b296574f74b99df1391e2dc65f210e9ea695fbbce34d770ecfcfba581
In Kubernetes you store authentication information as secret of type docker-registry. The following snippet shows how to create such a secret with kubectl leveraging the environment variables, you specified in the previous section:
# Create Secret in Kubernetes
kubectl create secret docker-registry ghcr \
    --docker-server ghcr.io \
    --docker-username $GH_USER \
    --docker-password $CR_PAT

secret/ghcr created
Scaffold the necessary SpinApp Custom Resource (CR) using spin kube scaffold:
# Scaffold the SpinApp manifest
spin kube scaffold --from ghcr.io/$GH_USER/hello-spin:0.0.1 \
    --out spinapp.yaml
Before deploying the manifest with kubectl, update spinapp.yaml and link the ghcr secret you previously created using the imagePullSecrets property. Your SpinApp manifest should look like this:
apiVersion: core.spinoperator.dev/v1alpha1
kind: SpinApp
metadata:
  name: hello-spin
spec:
  image: ghcr.io/$GH_USER/hello-spin:0.0.1
  imagePullSecrets:
    - name: ghcr
  replicas: 2
  executor: containerd-shim-spin
$GH_USERshould match the actual username provided while running through the previous sections of this article
Finally, you can deploy the app using kubectl apply:
# Deploy the spinapp.yaml using kubectl
kubectl apply -f spinapp.yaml
spinapp.core.spinoperator.dev/hello-spin created
6 - Scaling Spin App With Horizontal Pod Autoscaling (HPA)
Horizontal scaling, in the Kubernetes sense, means deploying more pods to meet demand (different from vertical scaling whereby more memory and CPU resources are assigned to already running pods). In this tutorial, we configure HPA to dynamically scale the instance count of our SpinApps to meet the demand.
Prerequisites
Please see the following sections in the Prerequisites page and fulfil those prerequisite requirements before continuing:
- Docker - for running k3d
- kubectl - the Kubernetes CLI
- k3d - a lightweight Kubernetes distribution that runs on Docker
- Helm - the package manager for Kubernetes
- Bombardier - cross-platform HTTP benchmarking CLI
We use k3d to run a Kubernetes cluster locally as part of this tutorial, but you can follow these steps to configure HPA autoscaling on your desired Kubernetes environment.
Setting Up Kubernetes Cluster
Run the following command to create a Kubernetes cluster that has the containerd-shim-spin pre-requisites installed: If you have a Kubernetes cluster already, please feel free to use it:
k3d cluster create wasm-cluster-scale \
  --image ghcr.io/spinkube/containerd-shim-spin/k3d:v0.14.1 \
  -p "8081:80@loadbalancer" \
  --agents 2
Deploying Spin Operator and its dependencies
First, you have to install cert-manager to automatically provision and manage TLS certificates (used by Spin Operator’s admission webhook system). For detailed installation instructions see the cert-manager documentation.
# Install cert-manager CRDs
kubectl apply -f https://github.com/cert-manager/cert-manager/releases/download/v1.14.3/cert-manager.crds.yaml

# Add and update Jetstack repository
helm repo add jetstack https://charts.jetstack.io
helm repo update

# Install the cert-manager Helm chart
helm install \
  cert-manager jetstack/cert-manager \
  --namespace cert-manager \
  --create-namespace \
  --version v1.14.3
Next, run the following commands to install the Spin Runtime Class and Spin Operator Custom Resource Definitions (CRDs):
Note: In a production cluster you likely want to customize the Runtime Class with a
nodeSelectorthat matches nodes that have the shim installed. However, in the K3d example, they’re installed on every node.
# Install the RuntimeClass
kubectl apply -f https://github.com/spinkube/spin-operator/releases/download/v0.1.0/spin-operator.runtime-class.yaml

# Install the CRDs
kubectl apply -f https://github.com/spinkube/spin-operator/releases/download/v0.1.0/spin-operator.crds.yaml
Lastly, install Spin Operator using helm and the shim executor with the following commands:
# Install Spin Operator
helm install spin-operator \
  --namespace spin-operator \
  --create-namespace \
  --version 0.1.0 \
  --wait \
  oci://ghcr.io/spinkube/charts/spin-operator

# Install the shim executor
kubectl apply -f https://github.com/spinkube/spin-operator/releases/download/v0.1.0/spin-operator.shim-executor.yaml
Great, now you have Spin Operator up and running on your cluster. This means you’re set to create and deploy SpinApps later on in the tutorial.
Set Up Ingress
Use the following command to set up ingress on your Kubernetes cluster. This ensures traffic can reach your SpinApp once we’ve created it in future steps:
# Setup ingress following this tutorial https://k3d.io/v5.4.6/usage/exposing_services/
cat <<EOF | kubectl apply -f -
apiVersion: networking.k8s.io/v1
kind: Ingress
metadata:
  name: nginx
  annotations:
    ingress.kubernetes.io/ssl-redirect: "false"
spec:
  rules:
  - http:
      paths:
      - path: /
        pathType: Prefix
        backend:
          service:
            name: hpa-spinapp
            port:
              number: 80
EOF
Hit enter to create the ingress resource.
Deploy Spin App and HorizontalPodAutoscaler (HPA)
Next up we’re going to deploy the Spin App we will be scaling. You can find the source code of the Spin App in the apps/cpu-load-gen folder of the Spin Operator repository.
We can take a look at the SpinApp and HPA definitions in our deployment file below/. As you can see, we have set our resources -> limits to 500m of cpu and 500Mi of memory per Spin application and we will scale the instance count when we’ve reached a 50% utilization in cpu and memory. We’ve also defined support a maximum replica count of 10 and a minimum replica count of 1:
apiVersion: core.spinoperator.dev/v1alpha1
kind: SpinApp
metadata:
  name: hpa-spinapp
spec:
  image: ghcr.io/spinkube/spin-operator/cpu-load-gen:20240311-163328-g1121986
  enableAutoscaling: true
  resources:
    limits:
      cpu: 500m
      memory: 500Mi
    requests:
      cpu: 100m
      memory: 400Mi
---
apiVersion: autoscaling/v2
kind: HorizontalPodAutoscaler
metadata:
  name: spinapp-autoscaler
spec:
  scaleTargetRef:
    apiVersion: apps/v1
    kind: Deployment
    name: hpa-spinapp
  minReplicas: 1
  maxReplicas: 10
  metrics:
    - type: Resource
      resource:
        name: cpu
        target:
          type: Utilization
          averageUtilization: 50
For more information about HPA, please visit the following links:
- Kubernetes Horizontal Pod Autoscaling
- Kubernetes HorizontalPodAutoscaler Walkthrough
- HPA Container Resource Metrics
Below is an example of the configuration to scale resources:
apiVersion: core.spinoperator.dev/v1alpha1
kind: SpinApp
metadata:
  name: hpa-spinapp
spec:
  image: ghcr.io/spinkube/spin-operator/cpu-load-gen:20240311-163328-g1121986
  executor: containerd-shim-spin
  enableAutoscaling: true
  resources:
    limits:
      cpu: 500m
      memory: 500Mi
    requests:
      cpu: 100m
      memory: 400Mi
---
apiVersion: autoscaling/v2
kind: HorizontalPodAutoscaler
metadata:
  name: spinapp-autoscaler
spec:
  scaleTargetRef:
    apiVersion: apps/v1
    kind: Deployment
    name: hpa-spinapp
  minReplicas: 1
  maxReplicas: 10
  metrics:
  - type: Resource
    resource:
      name: cpu
      target:
        type: Utilization
        averageUtilization: 50
Let’s deploy the SpinApp and the HPA instance onto our cluster (using the above .yaml configuration). To apply the above configuration we use the following kubectl apply command:
# Install SpinApp and HPA
kubectl apply -f https://raw.githubusercontent.com/spinkube/spin-operator/main/config/samples/hpa.yaml
You can see your running Spin application by running the following command:
kubectl get spinapps
NAME          AGE
hpa-spinapp   92m
You can also see your HPA instance with the following command:
kubectl get hpa
NAME                 REFERENCE                TARGETS   MINPODS   MAXPODS   REPLICAS   AGE
spinapp-autoscaler   Deployment/hpa-spinapp   6%/50%    1         10        1          97m
Please note: The Kubernetes Plugin for Spin is a tool designed for Kubernetes integration with the Spin command-line interface. The Kubernetes Plugin for Spin has a scaling tutorial that demonstrates how to use the
spin kubecommand to tell Kubernetes when to scale your Spin application up or down based on demand).
Generate Load to Test Autoscale
Now let’s use Bombardier to generate traffic to test how well HPA scales our SpinApp. The following Bombardier command will attempt to establish 40 connections during a period of 3 minutes (or less). If a request is not responded to within 5 seconds that request will timeout:
# Generate a bunch of load
bombardier -c 40 -t 5s -d 3m http://localhost:8081
To watch the load, we can run the following command to get the status of our deployment:
kubectl describe deploy hpa-spinapp
...
---

Available      True    MinimumReplicasAvailable
Progressing    True    NewReplicaSetAvailable
OldReplicaSets:  <none>
NewReplicaSet:   hpa-spinapp-544c649cf4 (1/1 replicas created)
Events:
  Type    Reason             Age    From                   Message
  ----    ------             ----   ----                   -------
  Normal  ScalingReplicaSet  11m    deployment-controller  Scaled up replica set hpa-spinapp-544c649cf4 to 1
  Normal  ScalingReplicaSet  9m45s  deployment-controller  Scaled up replica set hpa-spinapp-544c649cf4  to 4
  Normal  ScalingReplicaSet  9m30s  deployment-controller  Scaled up replica set hpa-spinapp-544c649cf4  to 8
  Normal  ScalingReplicaSet  9m15s  deployment-controller  Scaled up replica set hpa-spinapp-544c649cf4  to 10
7 - Scaling Spin App With Kubernetes Event-Driven Autoscaling (KEDA)
KEDA extends Kubernetes to provide event-driven scaling capabilities, allowing it to react to events from Kubernetes internal and external sources using KEDA scalers. KEDA provides a wide variety of scalers to define scaling behavior base on sources like CPU, Memory, Azure Event Hubs, Kafka, RabbitMQ, and more. We use a ScaledObject to dynamically scale the instance count of our SpinApp to meet the demand.
Prerequisites
Please see the following sections in the Prerequisites page and fulfil those prerequisite requirements before continuing:
- kubectl - the Kubernetes CLI
- Helm - the package manager for Kubernetes
- Docker - for running k3d
- k3d - a lightweight Kubernetes distribution that runs on Docker
- Bombardier - cross-platform HTTP benchmarking CLI
We use k3d to run a Kubernetes cluster locally as part of this tutorial, but you can follow these steps to configure KEDA autoscaling on your desired Kubernetes environment.
Setting Up Kubernetes Cluster
Run the following command to create a Kubernetes cluster that has the containerd-shim-spin pre-requisites installed: If you have a Kubernetes cluster already, please feel free to use it:
k3d cluster create wasm-cluster-scale \
  --image ghcr.io/spinkube/containerd-shim-spin/k3d:v0.14.1 \
  -p "8081:80@loadbalancer" \
  --agents 2
Deploying Spin Operator and its dependencies
First, you have to install cert-manager to automatically provision and manage TLS certificates (used by Spin Operator’s admission webhook system). For detailed installation instructions see the cert-manager documentation.
# Install cert-manager CRDs
kubectl apply -f https://github.com/cert-manager/cert-manager/releases/download/v1.14.3/cert-manager.crds.yaml

# Add and update Jetstack repository
helm repo add jetstack https://charts.jetstack.io
helm repo update

# Install the cert-manager Helm chart
helm install \
  cert-manager jetstack/cert-manager \
  --namespace cert-manager \
  --create-namespace \
  --version v1.14.3
Next, run the following commands to install the Spin Runtime Class and Spin Operator Custom Resource Definitions (CRDs):
Note: In a production cluster you likely want to customize the Runtime Class with a
nodeSelectorthat matches nodes that have the shim installed. However, in the K3d example, they’re installed on every node.
# Install the RuntimeClass
kubectl apply -f https://github.com/spinkube/spin-operator/releases/download/v0.1.0/spin-operator.runtime-class.yaml

# Install the CRDs
kubectl apply -f https://github.com/spinkube/spin-operator/releases/download/v0.1.0/spin-operator.crds.yaml
Lastly, install Spin Operator using helm and the shim executor with the following commands:
# Install Spin Operator
helm install spin-operator \
  --namespace spin-operator \
  --create-namespace \
  --version 0.1.0 \
  --wait \
  oci://ghcr.io/spinkube/charts/spin-operator

# Install the shim executor
kubectl apply -f https://github.com/spinkube/spin-operator/releases/download/v0.1.0/spin-operator.shim-executor.yaml
Great, now you have Spin Operator up and running on your cluster. This means you’re set to create and deploy SpinApps later on in the tutorial.
Set Up Ingress
Use the following command to set up ingress on your Kubernetes cluster. This ensures traffic can reach your Spin App once we’ve created it in future steps:
# Setup ingress following this tutorial https://k3d.io/v5.4.6/usage/exposing_services/
cat <<EOF | kubectl apply -f -
apiVersion: networking.k8s.io/v1
kind: Ingress
metadata:
  name: nginx
  annotations:
    ingress.kubernetes.io/ssl-redirect: "false"
spec:
  rules:
  - http:
      paths:
      - path: /
        pathType: Prefix
        backend:
          service:
            name: keda-spinapp
            port:
              number: 80
EOF
Hit enter to create the ingress resource.
Setting Up KEDA
Use the following command to setup KEDA on your Kubernetes cluster using Helm. Different deployment methods are described at Deploying KEDA on keda.sh:
# Add the Helm repository
helm repo add kedacore https://kedacore.github.io/charts

# Update your Helm repositories
helm repo update

# Install the keda Helm chart into the keda namespace
helm install keda kedacore/keda --namespace keda --create-namespace
Deploy Spin App and the KEDA ScaledObject
Next up we’re going to deploy the Spin App we will be scaling. You can find the source code of the Spin App in the apps/cpu-load-gen folder of the Spin Operator repository.
We can take a look at the SpinApp and the KEDA ScaledObject definitions in our deployment files below. As you can see, we have explicitly specified resource limits to 500m of cpu (spec.resources.limits.cpu) and 500Mi of memory (spec.resources.limits.memory) per SpinApp:
# https://raw.githubusercontent.com/spinkube/spin-operator/main/config/samples/keda-app.yaml
apiVersion: core.spinoperator.dev/v1alpha1
kind: SpinApp
metadata:
  name: keda-spinapp
spec:
  image: ghcr.io/spinkube/spin-operator/cpu-load-gen:20240311-163328-g1121986
  executor: containerd-shim-spin
  enableAutoscaling: true
  resources:
    limits:
      cpu: 500m
      memory: 500Mi
    requests:
      cpu: 100m
      memory: 400Mi
---
We will scale the instance count when we’ve reached a 50% utilization in cpu (spec.triggers[cpu].metadata.value). We’ve also instructed KEDA to scale our SpinApp horizontally within the range of 1 (spec.minReplicaCount) and 20 (spec.maxReplicaCount).:
# https://raw.githubusercontent.com/spinkube/spin-operator/main/config/samples/keda-scaledobject.yaml
apiVersion: keda.sh/v1alpha1
kind: ScaledObject
metadata:
  name: cpu-scaling
spec:
  scaleTargetRef:
    name: keda-spinapp
  minReplicaCount: 1
  maxReplicaCount: 20
  triggers:
    - type: cpu
      metricType: Utilization
      metadata:
        value: "50"
The Kubernetes documentation is the place to learn more about limits and requests. Consult the KEDA documentation to learn more about ScaledObject and KEDA’s built-in scalers.
Let’s deploy the SpinApp and the KEDA ScaledObject instance onto our cluster with the following command:
# Deploy the SpinApp
kubectl apply -f config/samples/keda-app.yaml
spinapp.core.spinoperator.dev/keda-spinapp created

# Deploy the ScaledObject
kubectl apply -f config/samples/keda-scaledobject.yaml
scaledobject.keda.sh/cpu-scaling created
You can see your running Spin application by running the following command:
kubectl get spinapps

NAME          READY REPLICAS   EXECUTOR
keda-spinapp  1                containerd-shim-spin
You can also see your KEDA ScaledObject instance with the following command:
kubectl get scaledobject

NAME          SCALETARGETKIND      SCALETARGETNAME   MIN   MAX   TRIGGERS   READY   ACTIVE   AGE
cpu-scaling   apps/v1.Deployment   keda-spinapp      1     20    cpu        True    True     7m
Generate Load to Test Autoscale
Now let’s use Bombardier to generate traffic to test how well KEDA scales our SpinApp. The following Bombardier command will attempt to establish 40 connections during a period of 3 minutes (or less). If a request is not responded to within 5 seconds that request will timeout:
# Generate a bunch of load
bombardier -c 40 -t 5s -d 3m http://localhost:8081
To watch the load, we can run the following command to get the status of our deployment:
kubectl describe deploy keda-spinapp
...
---

Available      True    MinimumReplicasAvailable
Progressing    True    NewReplicaSetAvailable
OldReplicaSets:  <none>
NewReplicaSet:   keda-spinapp-76db5d7f9f (1/1 replicas created)
Events:
  Type    Reason             Age   From                   Message
  ----    ------             ----  ----                   -------
  Normal  ScalingReplicaSet  84s   deployment-controller  Scaled up replica set hpa-spinapp-76db5d7f9f  to 2 from 1
  Normal  ScalingReplicaSet  69s   deployment-controller  Scaled up replica set hpa-spinapp-76db5d7f9f  to 4 from 2
  Normal  ScalingReplicaSet  54s   deployment-controller  Scaled up replica set hpa-spinapp-76db5d7f9f  to 8 from 4
  Normal  ScalingReplicaSet  39s   deployment-controller  Scaled up replica set hpa-spinapp-76db5d7f9f  to 16 from 8
  Normal  ScalingReplicaSet  24s   deployment-controller  Scaled up replica set hpa-spinapp-76db5d7f9f  to 20 from 16
8 - Share Spin Operator Image
You can build and push the Spin Operator image using the docker-build and docker-push targets specified in the Makefile.
- The
docker-buildtask invokes localdockertooling and builds a Docker image matching your local system architecture. - The
docker-pushtask invokes localdockertooling and pushes the Docker image to a container registry.
You can chain both targets using make docker-build docker-push to perform build and push at once.
Ensure to provide the fully qualified image name as IMG argument to push your custom Spin Operator image to the desired container registry:
# Build & Push the Spin Operator Image
make docker-build docker-push IMG=<some-registry>/spin-operator:tag
This image ought to be published in the personal registry you specified. And it is required to have access to pull the image from the working environment. Make sure you have the proper permission to the registry if the above command doesn’t work.
Build and Push multi-arch Images
There are scenarios where you may want to build and push the Spin Operator image for multiple architectures. This is done by using the underlying Buildx capabilitites provided by Docker.
You use the docker-build-and-publish-all target specified in the Makefile to build and push the Spin Operator image for multiple architectures at once:
# Build & Push the Spin Operator Image for arm64 and amd64
make docker-build-and-publish-all
Optionally, you can specify desired architectures by providing the PLATFORMS argument as shown here:
# Build & Push the Spin Operator Image form desired architectures explicitly
make docker-build-and-publish-all PLATFORMS=linux/arm64,linux/amd64
9 - Spin Operator Development
To Deploy on the Cluster
Build and push your image to the location specified by IMG:
make docker-build docker-push IMG=<some-registry>/spin-operator:tag
NOTE: This image ought to be published in the personal registry you specified. And it is required to have access to pull the image from the working environment. Make sure you have the proper permission to the registry if the above commands don’t work.
Apply the Runtime Class to the cluster:
kubectl apply -f config/samples/spin-runtime-class.yaml
Install the CRDs into the cluster:
make install
Deploy cert-manager to the cluster:
kubectl apply -f https://github.com/cert-manager/cert-manager/releases/download/v1.14.3/cert-manager.yaml
NOTE: Cert-manager is required to manage the TLS certificates for the admission webhooks.
Deploy the Manager to the cluster with the image specified by IMG:
make deploy IMG=<some-registry>/spin-operator:tag
NOTE: If you encounter RBAC errors, you may need to grant yourself cluster-admin privileges or be logged in as admin.
Create instances of your solution You can apply the samples (examples) from the config/sample:
kubectl apply -k config/samples/
NOTE: Ensure that the samples has default values to test it out.
To Uninstall
Delete the instances (CRs) from the cluster:
kubectl delete -k config/samples/
Delete the APIs(CRDs) from the cluster:
make uninstall
Delete the Runtime Class from the cluster:
kubectl delete -f config/samples/spin-runtime-class.yaml
UnDeploy the controller from the cluster:
make undeploy
UnDeploy cert-manager from the cluster:
kubectl delete -f https://github.com/cert-manager/cert-manager/releases/download/v1.14.3/cert-manager.yaml
Packaging and deployment via Helm
The Spin Operator chart is assembled via a combination of helmify using the kustomize manifests from the config directory as well as other non-kustomize items such as the NOTES.txt and Chart.yaml.
NOTE: Manual changes to helmify-generated resources, including the values.yml file and applicable resources in templates are not persisted across helmify invocations.
Generate the Helm chart:
make helm-generate
Install the Helm chart onto the cluster:
Note: CRDs and the wasm-spin-v2 RuntimeClass are currently not installed as part of the chart. You’ll need to ensure these are present via the method(s) mentioned above.
make helm-install
Follow the release notes printed after helm installs the chart for next steps.
Upgrade the Helm release on the cluster:
make helm-upgrade
Delete the Helm release from the cluster:
make helm-uninstall
10 - Running locally
Prerequisites
Please ensure that your system has all the prerequisites installed before continuing.
Fetch Spin Operator (Source Code)
Clone the Spin Operator repository:
git clone https://github.com/spinkube/spin-operator.git
Change into the Spin Operator directory:
cd spin-operator
Setting Up Kubernetes Cluster
Run the following command to create a Kubernetes k3d cluster that has the containerd-shim-spin pre-requisites installed:
k3d cluster create wasm-cluster --image ghcr.io/spinkube/containerd-shim-spin/k3d:v0.14.1 -p "8081:80@loadbalancer" --agents 2
Run the following command to install the Custom Resource Definitions (CRDs) into the cluster:
make install
Running spin-operator
Run the following command to run the Spin Operator locally:
make run
In a fresh terminal, run the following command to create a Runtime Class named wasmtime-spin-v2:
kubectl apply -f - <<EOF
apiVersion: node.k8s.io/v1
kind: RuntimeClass
metadata:
  name: wasmtime-spin-v2
handler: spin
EOF
A SpinAppExecutor is a custom resource that defines how an application should be executed. The SpinAppExecutor provides ways for the user to configure how the application should run, like which runtime class to use.
SpinAppExecutors can be defined at the namespace level, allowing multiple SpinAppExecutors to refer to different runtime classes in the same namespace. This means that a SpinAppExecutor must exist in every namespace where a SpinApp is to be executed.
Run the following command to create a SpinAppExecutor using the same runtime class as the one created above:
kubectl apply -f - <<EOF
apiVersion: core.spinoperator.dev/v1alpha1
kind: SpinAppExecutor
metadata:
  name: containerd-shim-spin
spec:
  createDeployment: true
  deploymentConfig:
    runtimeClassName: wasmtime-spin-v2
EOF
Running the Sample Application
Run the following command, in a different terminal window:
kubectl apply -f ./config/samples/simple.yaml
Run the following command to obtain the name of the pod you have running:
kubectl get pods
The above command will return information similar to the following:
NAME                              READY   STATUS    RESTARTS   AGE
simple-spinapp-5b8d8d69b4-snscs   1/1     Running   0          3m40s
Using the NAME from above, run the following kubectl command to listen on port 8083 locally and
forward to port 80 in the pod:
kubectl port-forward simple-spinapp-5b8d8d69b4-snscs 8083:80
The above command will return the following forwarding mappings:
Forwarding from 127.0.0.1:8083 -> 80
Forwarding from [::1]:8083 -> 80
In a fresh terminal, run the following command:
curl localhost:8083/hello
The above command will return the following message:
Hello world from Spin!
11 - Running on a Cluster
Prerequisites
Please ensure that your system has all the prerequisites installed before continuing.
Running on Your Kubernetes Cluster
This is the standard development workflow for when you want to test running Spin Operator on a Kubernetes cluster. This is harder than running Spin Operator on your local machine, but deploying Spin Operator into your cluster lets you test things like webhooks.
Note that you need to install cert-manager for webhook support.
To install cert-manager with the default config
kubectl apply -f https://github.com/cert-manager/cert-manager/releases/download/v1.14.3/cert-manager.yaml
Deploy the Manager to the cluster with the image specified by IMG:
make deploy IMG=<some-registry>/spin-operator:tag
NOTE: If you encounter RBAC errors, you may need to grant yourself cluster-admin privileges or be logged in as admin.
To create instances of your solution, apply the samples (examples) from the config/sample:
kubectl apply -k config/samples/
NOTE: Ensure that the samples has default values to test it out.
12 - Uninstall
These are commands to delete, uninstall and undeploy resources.
Delete (CRs)
The following command will delete the instances (CRs) from the cluster:
kubectl delete -k config/samples/
Delete APIs(CRDs)
The following command will uninstall CRDs from the Kubernetes cluster specified in ~/.kube/config:
make uninstall
Call with
ignore-not-found=trueto ignore resource not found errors during deletion.
UnDeploy
The following command will undeploy the controller from the Kubernetes cluster specified in ~/.kube/config:
make undeploy
Call with
ignore-not-found=trueto ignore resource not found errors during deletion.